
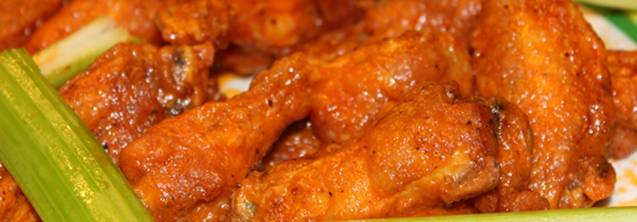
This is the true Buffalo Chicken Wings recipe straight from Buffalo, New York: fried plain with no breading, tossed in a simple hot sauce and butter mixture, and finished with a short blast in the oven to set the coating. Frank’s Original Hot Sauce isn’t optional here, it’s the one ingredient every version of the original recipe agrees on.
In 1964, on a late Friday night at the Anchor Bar in Buffalo, New York, owners Teressa and Frank Bellissimo were down to a batch of chicken wings meant for stock. Frank tossed them in the deep fryer, coated them in hot sauce and butter, and served them with blue cheese dressing to cut the heat. The wing as we know it was born that night, and the recipe hasn’t really changed since.
I made these the way the Bellissimos did it: wings fried naked, no flour coating, no baking. Frank’s Original Hot Sauce is the only sauce that gets the flavor and texture right. I also season the wings with salt and pepper before they hit the fryer, which most recipes skip and shouldn’t, and I finish them with four minutes in a 400 degree oven after saucing to set the coating without drying out the meat.
My wife told me these were the best wings she’s ever had. My daughter’s friend, who can’t handle much heat, finished a full plate of the medium batch without blinking. That’s the range this recipe hits.
Buffalo Chicken Wings Recipe
Ingredients
- 6-8 Pieces whole Chicken Wings
- 4-6 Cups Oil (I used Canola oil, for frying)
- Salt
- Pepper (Black, freshly ground)
- 4 Tbsp Butter
- 4 Tbsp Frank’s Original Hot Sauce
Method
- Start by pre-heating your oven to 400 degrees so it’s ready when your first batch of wings are done.
- Prepare your deep fryer or pan for the chicken wings. You'll need it to be set for 375 degrees and ALWAYS make sure you leave enough room for the chicken and expect the oil to bubble a bit. BE VERY CAREFUL and give yourself more room than you may think you'll need.
- Wash the chicken and cut it into three pieces at each joint. You can toss the very tip of the wing or use it for making broth.
- Pat the chicken completely dry with paper towels and place on a single layer in a plate or bowl.
- Sprinkle with salt and freshly ground black pepper.
- Continue to cut, layer and season the chicken until it’s all done.
- Check to be sure your oil is ready at 375 degrees
- Place the drumettes (the part of the wings that look like mini-drumsticks) into the oil first and cook for about 2 minutes.
- Move the chicken around to keep them separated and add in the rest of the pieces of wings. If you're doing more than 6-8 whole wings, do them in batches, depending on the size of your fryer. If you put too many in at one time, you'll drop the temperature of the oil too much. It should drop to about 350 if done correctly.
- Cook for an additional 13 minutes (15 minutes total) or until the bubbling slows considerably.
- While the wings are cooking, prepare your sauce.
- In a small sauce pan over medium heat, add in the butter and hot sauce. Remember your ratio's (butter:hot sauce) for hot (1:3), medium(1:1) and mild (3:1).
- Once the butter is melted, simmer over a medium to medium-low heat until the chicken wings are done (approximately 10-15 minutes).
- Remove the wings from the fryer and cool in a single layer on a rack or a platter covered in paper towels and let drain for about 2 minutes.
- Place the wings into a large bowl and pour the sauce over the top.
- You can stir with a spoon but if you're feeling adventurous, try tossing them until completely coated with sauce.
- Place on a baking sheet in a single layer and place on the middle rack in the oven.
- Bake at 400 degrees for 4 minutes.
- Remove from the oven and serve immediately with cool celery and a side of blue cheese dressing.
Pro Tips for Restaurant Quality Buffalo Wings
Butter vs. Margarine (Then and Now)
Here’s an inconvenient truth for purists: the original Anchor Bar recipe almost certainly used margarine, not butter. In 1964, margarine was considered the “healthier” fat, made from vegetable oil instead of animal fat, and it was standard in most American kitchens. That’s not opinion, it’s just what people believed at the time.
We know better now. My recommendation is real butter, and specifically grass-fed butter if you can get it. It’s a more natural product, and I’d rather cook with the real thing than a processed substitute, even if it means straying slightly from the “historically accurate” version. If you want to chase pure authenticity, margarine gets you closer to 1964. If you want the better wing, use butter.
Only Use Frank’s Original Hot Sauce
This one isn’t up for debate. Frank’s Original has a flavor and texture that blends with butter (or margarine) in a way nothing else replicates, and it’s the sauce the Anchor Bar actually used. Order it online if you have to, just don’t substitute. And don’t grab Frank’s Wing Sauce by mistake. It’s not the same. Trust me.
Season Your Wings Before You Fry Them
This is a step a lot of people skip, and it’s one of the biggest differences between good wings and great wings. Use fresh chicken, not individually frozen wings. Pat every wing completely dry after washing, then season each layer with salt and freshly ground black pepper as you stack them in the bowl. My recommendation is to go a little more liberal on the pepper and light on the salt. Most recipes skip seasoning the chicken itself and rely entirely on the sauce. Don’t make that mistake.
Simmer the Sauce and Adjust the Ratio to Your Taste
Let your sauce simmer on low to low-medium heat so it thickens, stirring frequently to keep it from seperating which it will do easily. A one-to-one ratio of margarine to hot sauce will give you medium heat. Want it spicier? Go with three parts hot sauce to one part margarine. Want it milder? Flip the ratio to three parts margarine to one part hot sauce. Medium is milder than people expect, tolerable even for someone who doesn’t handle spice well.
Finish the Wings in the Oven
After tossing your fried wings in the sauce, spread them on a cookie sheet and bake at 400°F for about 4 minutes. Don’t go longer or you’ll dry them out. This step bakes the sauce onto the wing instead of leaving a slippery coating, and it’s the difference between homemade and restaurant-quality texture.
Frequently Asked Questions
Storage and Reheating Buffalo Chicken Wings
You can safely store your leftover Buffalo Chicken Wings in a sealed container in the refrigerator for 3-4 days.
Do not reheat them in the microwave. They’ll turn the chicken rubbery and you worked too hard to get these perfect to ruin them in the microwave. Spread your Buffalo chicken wings on a backing sheet and reheat in a 400 degree oven for 8-10 minutes.
If you want to freeze a batch, freeze them after frying and before you sauce them. When you’re ready to enjoy your wings again, reheat your frozen wings on a baking sheet in a 400 degree oven for 20-25 minutes, turning them halfway, until they’re fully hot and the outside is crispy again.
Don’t defrost your wings before baking them. This will turn the skin soggy and they won’t crisp up the same. Once they’re done in the oven, toss them in your sauce and put them back into the oven for another 4 minutes to set the sauce.

Thanks for posting this recipe.I am originally from the home of the chicken wing and this recipe is pretty much spot on to the real deal.Your instructions are precise and easy and you actually included blue cheese dip not ranch as some are prone to do..No weird fancy added spices or additions , just a great recipe plain and simple.Thank you for not trying to make Buffalo wings into something they are not.PS – Frank’s now makes a Buffalo Wing sauce which heat wise and taste wise is the same as the original but a bit richer tasting. Try it out
You made my day Barb. I hope you don’t mind, but I shared your comment on my Facebook page.
I put a lot of effort into researching this recipe, but you never know how it’s going to be received. So, seeing your comment told me it was worth every moment of effort! Thanks again.